Content
This helps avoid issues like tax-exempt line items showing up as Zero Rated EC Services. Fees Account – This account collects your payment gateway fees.
That wraps up the section on how to create a bill. The next lesson in our Xero Training Course will be how to pay bills.
Save – You can either save the bill or approve it. Below is a brief description of the various save options. Region – You can turn on tracking categories to track other areas of your business like location, department or region. Select the appropriate category from the dropdown. You can include any additional info that you would like to keep track of in this field. Step 2 – Click on the “New” button and select Bill as indicated in the screenshot below. Step 1 – From the Accounts menu, select Purchases as indicated in the screenshot below.
Repeat transaction every – From the dropdown, select month or week and indicate a number in the box to the left of this field. A. Repeating Bill – Below is a screenshot along with the info that you need to provide to set up a repeating bill. Step 1 – Follow the steps in the previous section to display the bill. You can make any changes that you need to and save/approve them once you are done. Click anywhere in the row of the bill that you want to select.
Just double-check you’re sending it to the right person or department. Just as you discuss pricing before reaching a deal with customers, you should also chat about billing. Set out payment terms explaining when you’ll invoice (weekly, monthly, or when the job’s done), and how long they’ll have to pay. A customer should know when they’ll need to part with their cash. You can’t get paid until the customer has the bill. Send your invoice and put the ball into their court as soon as you can.
Woocommerce Docs
Better still, online invoices allow you to include a “pay now” button. Customers just click through to pay immediately via credit card, debit card, or automated clearing houses . The most important part of your invoice email is the subject line.
This is to help you, the customer, or potentially auditors to track down specific invoices. Hit Export and it will create one invoice per Employee. It will automatically match tracking categories per invoice line based on the “Export Code” of the areas. This is ideal if your employees have worked with customer and you want to bill time worked to customers (e.g. Recruitment companies). Deputy does not have CRM capability so we will assume you are using Deputy’s scheduling area’s or locations as customers. You can certainly setup Customer names such as “ABC Pty Ltd”, “ACME Ltd” as scheduling areas or locations. No, once you’ve successfully connected your Xero account to Biller Genie, customer data will automatically sync between both platforms.
Anytime multiple appointments are scheduled at once an invoice will be created for each. This allows additional flexibility when handling cancellations and rescheduling. You would set up a Stripe account through Xero and attach Stripe as a payment service to Xero invoices. Provide this email address to suppliers, customers and anyone else who sends you documents that you would like to attach to transactions. One of the newest features that Xero offers is called side-by-side files. This cool feature allows you to store copies of your bills, invoices and other documents within Xero next to the transactions they relate to. This will allow you to easily access these documents during tax season, or in case of an audit.
Step 4
Make sure it’s been received by the right person, that they understand what it’s for, and that they don’t need any more details from you. There will be a more detailed description of the goods or services on the invoice itself. Finish with clear instructions on when and how to pay. You can get more in our guide on how to make an invoice. Convert your invoice to a PDF so it’s harder for fraudsters to interfere with it. Templates will help you get your invoice format right, because all the fields are preset. You just have to open it up and fill it out.
You can find more info on recurring transactions here. Managing your small business has never been easier than with Xero accounting software. From your billing to payroll to contact management, Xero has got you covered and will save you hours upon hours every month.
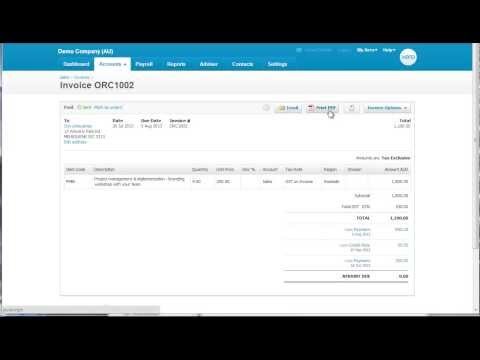
Step 2 – You should see an invoice dashboard similar to the one below. A brief description of the information you see here is below. Step 1 – Return back to Invoices by selecting Accounts and then Sales as indicated below.
After The Invoice Is Sent
Some of the details, such as your business name, will stay the same from one invoice to the next. Lock those things into your invoice template so you don’t have to keep rewriting them every time. Before drawing up an invoice, make sure your customer is expecting one. If your invoice comes out of nowhere, they may be slow to pay it, or even annoyed.
- We will discuss how batch payments work in the next lesson.
- Always provide a description of the goods or services supplied so the customer knows what they’re paying for.
- Make any necessary changes to the bill and save it.
- This allows additional flexibility when handling cancellations and rescheduling.
- In the How to Create An Accounts Receivable Aging Report, I will share some tips with you on how to stay on top of your accounts receivable balances.
- , you need to save new WooCommerce customers as Xero leads and connect your WooCommerce store.
Within Teamwork, you can choose to export an invoice from a project to your Xero Online account. Click Create Invoice and you’ll be prompted to enter the invoice details. When you’re finished, click Create Invoice Draft.
We analyzed millions of invoices and talked with our small business customers to find out the most successful ways to invoice. No more chasing late payers – set up payment reminders that automatically send just before or after an invoice is due. If you’re creating your invoices in a Word document or spreadsheet, save it as a PDF before sending. That simple step can give you some protection against fraudsters. New invoice reminders are turned on when you first sync Xero with your Biller Genie account, and all open invoices will be automatically re-sent. Send online invoices to your customers – and get updated when they’re opened.
Invoices which are marked PAID cannot be modified via the API and thus would have to be voided/modified manually at Xero.com. Note that this is not an “Inventory Sync” as this will only reduce the existing quantity of inventory items in Xero when a corresponding item is sold. It will not synchronize your Xero and WooCommerce inventories if the inventory quantity is adjusted in either system. Rounding Account – This account collects all the rounding corrections.
Sign Up To Xero And Get More From Your Invoices
Overdue – These are invoices that have been sent to customers and they have not been paid as of their due dates which make them overdue/past due. In the How to Create An Accounts Receivable Aging Report, I will share some tips with you on how to stay on top of your accounts receivable balances. It provides your customer with the details of the products and/or services they have purchased on a professionally-formatted document. In the How to Setup Invoices lesson, we showed you how to customize your invoices by selecting a branding theme and adding your company logo. With WebMerge you can generate customized invoices, receipts, letters, and more directly from your Xero account. In this example we’re going to show you how to create a customized invoice from Xero and email it directly to your customer. We’ll be using Zapier to help connect Xero with WebMerge.
All invoices, including outstanding and overdue invoices, are visible to your entire team, making collections easier and faster. Avoid using inaccurate information by empowering your team to edit client contact details when necessary. Allow your sales and support teams to view the client’s current financial status in Salesforce, including any overdue invoices. We guarantee our software will streamline your sales and finance processes and we will point you in the right direction in the unlikely event we can’t. Make sure that the account you specified for “Payment Account” in the Xero settings has “Enable Payments To This Account” checked in Xero. This will need to be either a Bank account type or a Revenue/Sales account type. Please check your Xero configuration and make sure the inventory item is setup correctly.
To use this feature, you can either email documents to your Xero Inbox or drag & drop documents directly into the inbox. At this point, you can approve the invoices and email them to your customers. Xero allows you to group your customer contacts that have something in common. For example, you might group customers you send the same invoice to. Share Invoice – You can share a link to an invoice that is either awaiting payment or in a paid status. Click this button to see a URL that you can copy and paste into an email to send to your customer.
How Do I Match The Tax Rate Label To What Is On Xero? Back To Top
Description – This field will auto populate based on the item you selected. If you did not select an item, then type the description that appears on the supplier bill.
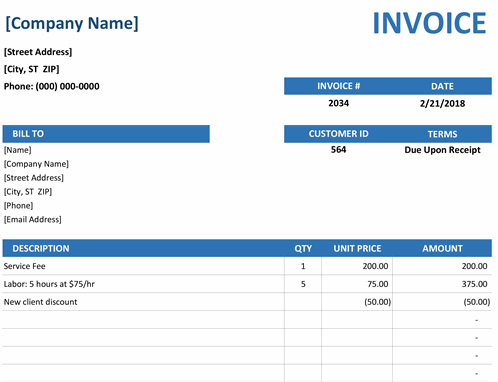
Save & add another – This option will save your invoice as a draft and open up a new blank invoice for you to complete. Follow the steps below to create an invoice in Xero. Below is a sample invoice created for a fictitious company, Acme Web Pros Plus. You are able to assign the account that you want to track the income when you create the invoice so that Xero can perform the accounting for you in the background.
Approve & print – This option will approve the invoice and allow you to print the invoice. Step 4 – Once you have completed all of the fields, you can click the “Save” or “Approve” button.
